SIMPLE TIMELAPSE CAMERA USING RASPBERRY PI AND A COFFEE TIN/AUGUST 21, 2013
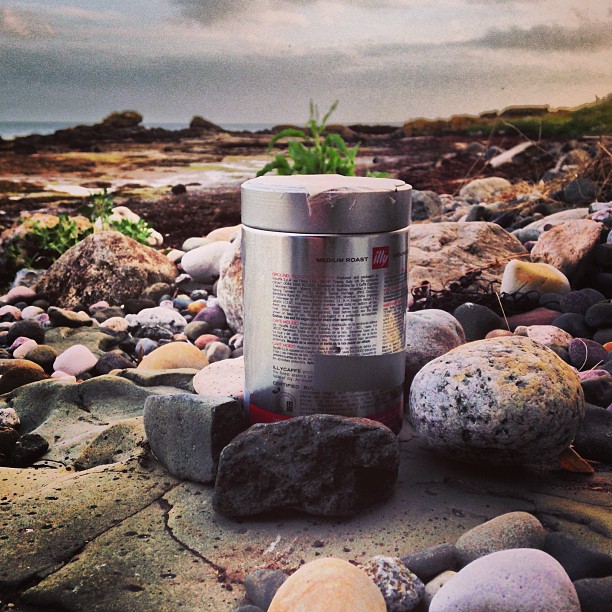
Whilst developing BerryCam I thought it would be pretty cool to create a timelapse camera that could be left outdoors over a period of time, to capture a sequence of images that could be later joined together into a video clip. From the outset thoughts turned to housing everything in an ‘Illy’ coffee tin as it was pretty robust, watertight and could easily contain the Raspberry Pi and battery pack.
WHAT YOU NEED
- Raspberry Pi – Model A or B (A has better battery life)
- Raspberry Pi camera module installed and set up
- Illy coffee tin or similar sized container. Watertight and metal is best.
- Some clear plastic, taped onto outer tin over hole
- Plastic holder for camera. I used the lid from the case of these batteries
- Elastic bands to hold the camera and cable in position
- Battery pack – a 4xAA unit is best for size to power rating – I used this one
- The raspiLapseCam.py Python script. Download from the FotosynLabs repo here
SETTING UP THE CAMERA
A small hole drilled into the side of the tin allows the camera module to peer out of the tin. Living in Scotland rain is always a factor, as is the sea spray where I have been testing the device out. Using some clear plastic – the sort you get on moulded packaging, was ideal to keep everything enclosed and safe from water. But make sure you use an area that is flat and free from scratches or blemishes and that it is of good quality plastic (ie almost perfectly clear).
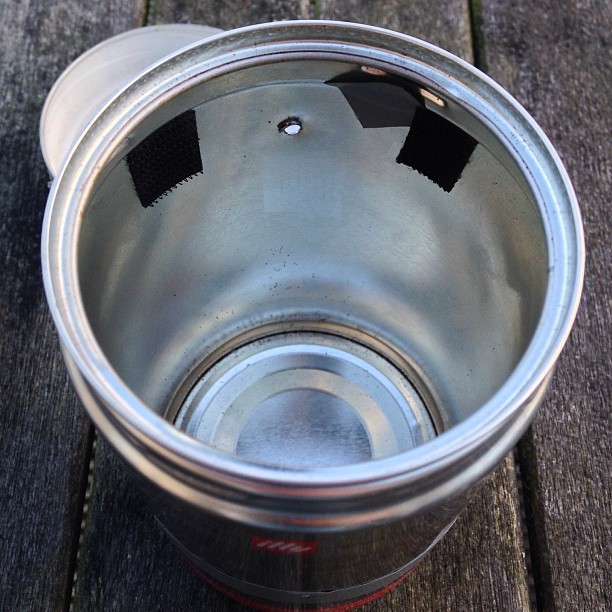
Showing hole drilled near top of tin with Velcro fasteners
Showing hole drilled near top of tin with Velcro fasteners
The camera module was mounted onto a plastic holder to easily allow for handling, adjustment and repositioning using Velcro tabs to mount this to the inside of the tin. Everything is held together with elastic bands, so changes in temperature and moisture won’t have as an immediate effect on adhesives. I had originally used electrical tape but the adhesive became soft, slightly gloopy and the pull of the ribbon between the Raspberry Pi and camera module had caused things to move about too easily.
Filling in behind this, is the power supply which keeps everything snug when in use. The particular unit has a handy power switch on top so you can easily switch the device on and off.
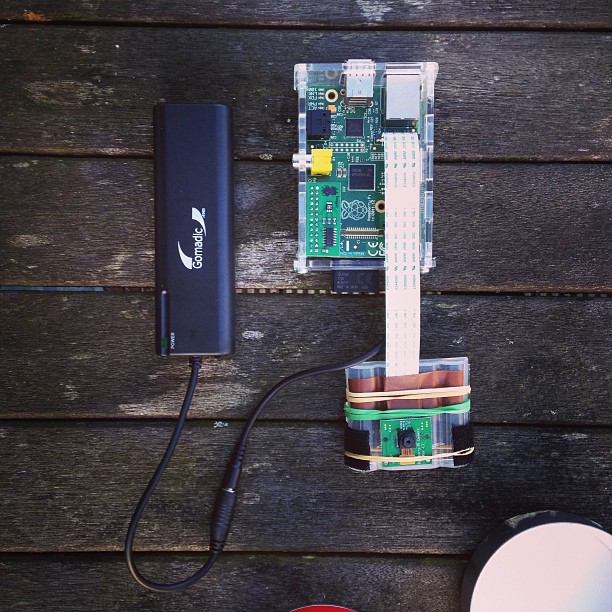
Inner workings of tin, all hooked up.
Inner workings of tin, all hooked up.
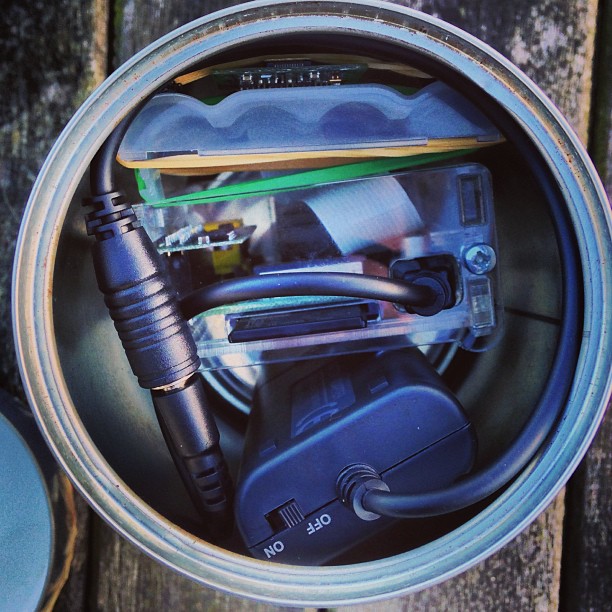
Everything loaded into the tin, top – camera module, middle – Raspberry Pi and bottom – battery pack.
Everything loaded into the tin: top – camera module, middle – Raspberry Pi, bottom – battery pack.
Using velcro on the plastic mount means you can easily remove the whole unit whenever you need access. When installing, make sure the camera is level in the tin (the edges of the plastic mount helps when aligned with the inner lip) and ensure the lens has an unobstructed view through the hole by looking through from the outside. If the lens appears centrally in this hole then it should ‘see’ everything without the edges of the hole creeping into the captured image. Testing is the best option to make sure everything is straight. Grabbing previews quickly with BerryCam is and ideal solution to do this.

Make sure the camera lens has an unobstructed view through the hole drilled into the tin.
Make sure the camera lens has an unobstructed view through the hole drilled into the tin.
With the camera installed – the Raspberry Pi and battery pack can easily be lifted out of the tin to allow of access to the various ports. I find it rests easily on the top of the tin when connecting to a display and keyboard if you need to use the device with a display. SSH works without the need to remove if you have a network connection available.
USING THE PYTHON SCRIPT AND SETTING UP RASPBIAN
Setting up Raspbian to control the camera is pretty easy. Using the raspiLapseCam.py script I opted for an automated startup when the device is booted up. That way there’s no need for any SSH commands to be issued and it is simply a case of flicking a switch. To do this log into your box using Terminal on the Pi or log in remotely using Terminal or Putty.
ssh pi@XX.XX.XX.XX(where XX.XX.XX.XX is the IP address of your Raspberry Pi)
First of all, we’ll need to get the Python script to control the camera. We’ll copy this into the /home directory as it’s easy to find and a good starting point, but copy to the place the suits you and your build. This is also a good time to create a folder to write images to, and change the permissions to make it writeable. This setup should work as the script writes to the folder /home/timelapse/ as a default; although you can change this if you wish. Just make sure you update the pathway within the Python script itself.
cd /home mkdir timelapse chmod 777 timelapse sudo wget https://bitbucket.org/fotosyn/fotosynlabs/raw/9304ee9262638efebdd66d543b844a3075401782/RaspiLapseCam/raspiLapseCam.py
To check everything is installed, simply type
ls
The script should be visible in the directory. Next, we can automate the startup so the camera activates each time it is powered up. To do we need to add a cron job. This will mean on each boot of the Raspberry Pi the script will activate and begin capturing images.
sudo nano crontab -e
At the bottom of the script insert
@reboot python /home/raspiLapseCam.py &
Of course change /home to the correct pathway where you have the script.
Save this script (CTRL + X) and « Y » Rebooting the device will mean this script executes. On testing I found that it needs a full shutdown before this will reliably work each time. So to reuse the device you’ll need to log in, and perform a shutdown with
sudo shutdown « now »
Once you have shut down correctly, you can simply switch on the Raspberry Pi’s battery power supply and the script will launch normally when the device boots up. This is easpecially useful if you’re deploying the timelapse camera for an extended period outside the range of network connections.
ISSUES WITH CRONTAB
There are some issues with using the above script and restarting the Pi. Dougie Lawson has very kindly posted some advice over on the Raspberry Pi forums on how to use init.d to make things startup more reliably.
A transcript of Dougie’s comments below…
Edit raspiLapseCam.py add #!/usr/bin/python save it chmod 755 raspiLapseCam.py That means you can execute it by typing raspiLapseCam.py rather than python raspiLapseCam.py, which is a bunch easier.
Then we can use an /etc/init.d script to get it started when the system boots.
Start by copying /etc/init.d/skeleton to /etc/init.d/timelapse. cd /etc/init.d && sudo cp skeleton timelapse edit /etc/init.d/timelapse (use sudo nano or sudo vi) change lines 23 & 24 to refer to the command /home/pi/raspiLapseCam.py you need to start at boot time (the skeleton has good comments). save it. sudo chmod 755 /etc/init.d/timelapse # to make it executable sudo update-rc.d timelapse enable # gets it started at system boot and killed at shutdown
USING THE CAMERA
raspiLapseCam.py will create a folder for each timelapse session. You can change where this saves within the .py file but as a default this is in the same location in a subfolder. This way you can easily grab all the images from a session and then sequence them into an animation or video clip.
The effects and adjustments are all still available as it uses raspistill to capture images. Simply edit these parameters within the script if you want to make changes.
Next thing is to use it! There are no rules but as a suggestion best times are at dawn and dusk when the light is at its most changeable and dramatic. Many photographers refer to this time as the ‘Golden Hour’
Shooting overnight proved a bit more tricky with everything in darkness. I guess there would be a trade-off between the required increase in exposure time and battery life. Under normal conditions I was getting around 7.5 hours uptime using standard Durcaell AA batteries and a Raspberry Pi Model B.
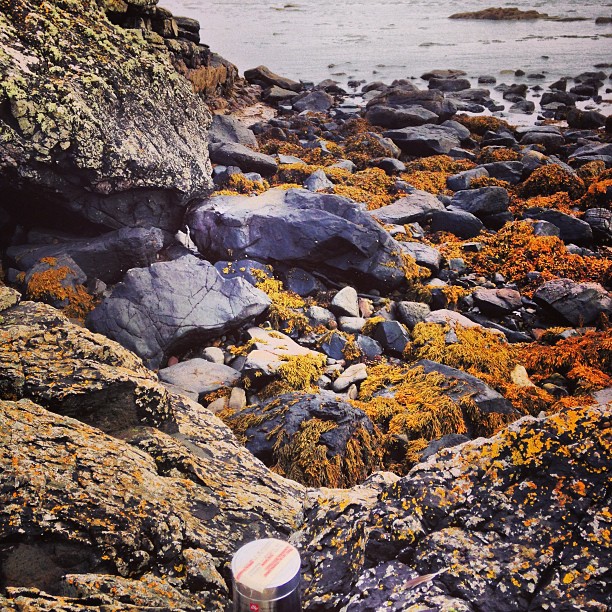
The Timelapse Camera set up in position
The Timelapse Camera set up in position
In this example I have set up the camera to shoot a big setting on the beach to catch the tide going out, some weather passing over and the clouds moving through the sky. When deploying outside, make sure your tin is securely closed and in a safe position so it won’t be blown away or toppled. Using a spirit level smartphone app while rested on top of the tin keeps everything level. And of course make sure the tin is secure and hidden from the view of passers by. Also make sure, if you do use this technique you don’t place it in places where such an item may cause alarm.
I did leave a note taped to the top of mine, explaining what it was and politely asking that it not be moved or disturbed. It all depends on where you use the camera but the rural southern coast of Arran with it’s rocky shore proved secure enough to leave out for lengthy periods of time.
Once you’re got everything in position and level, you’re good to go. Simply power up the camera, make sure all is secure and won’t be moved by a breeze and leave the camera to do its work.
POST CAPTURE AND EDITING
Putting the images together is easy. QuickTime allows you to join a sequence of images together and save out as a video clip. There are other tools out there like Premier and After Effects too. If you find your images are slightly off kilter I recommend running everything through a Photoshop action to remove the offset angle.
You can also combine still frames to make a movie clips using a command line entry like:
cd /<your_timelapse_folder> ls *.jpg > list.txt sudo apt-get install mencoder mencoder -nosound -ovc lavc -lavcopts vcodec=mpeg4:aspect=16/9:vbitrate=8000000 -vf scale=1920:1080 -o timelapse.avi -mf type=jpeg:fps=24 mf://@list.txt
It may take some experimentation to get everything the way you want it, but this is a great way to enjoy nature’s beauty, the changing light, weather systems and wildlife, even if the weather is inclement.
Posted in General, Raspberry Pi
